
2026年11月12日

This article is a localized edition of the Japanese original. Read the Japanese original
When you use Caddy as a reverse proxy for WordPress (Caddy accepts HTTPS and forwards over HTTP to WordPress running on Apache or Nginx + PHP behind it), you need a setting that tells WordPress "I am being served over HTTPS". Without it, three problems appear: the login screen keeps redirecting, images and CSS are loaded over http:// and cause mixed content, and the IP of every comment and login attempt becomes Caddy's IP.
Here is the conclusion up front.
- Caddy adds
X-Forwarded-ProtoandX-Forwarded-Forwhen proxying by default. No special settings are needed on the Caddy side. - In WordPress's
wp-config.php, checkHTTP_X_FORWARDED_PROTOand set$_SERVER['HTTPS']toon(the procedure WordPress officially recommends). - Fix the site URL to
https://withWP_HOMEandWP_SITEURL. - If you need the real client IP, restore it from
X-Forwarded-Forin the web server behind Caddy (Apache'smod_remoteip, Nginx'sreal_ip_header). OverwritingREMOTE_ADDRinside WordPress is a last resort. - If everything runs on one server, connecting Caddy directly to PHP-FPM with
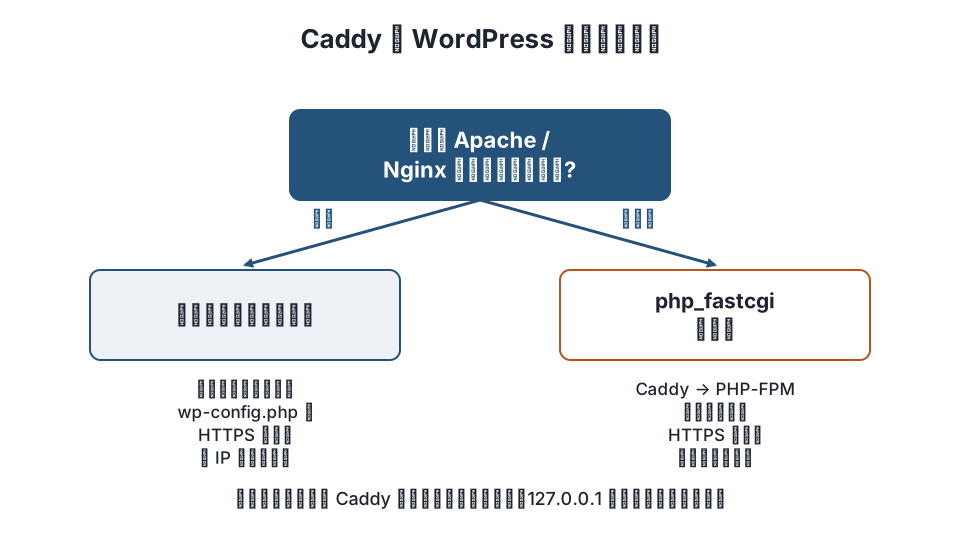
php_fastcgiinstead of proxying causes fewer problems.
How to write the Caddy reverse proxy itself (reverse_proxy, the conditions for automatic HTTPS, header_up, how to verify) is covered in "How to set up a reverse proxy with Caddy". This article follows on from it and deals only with the WordPress-specific problems.
The two setups
| Setup | How it works | Advantages | Common problems |
|---|---|---|---|
| Direct | Caddy → PHP-FPM (php_fastcgi) |
Little configuration. WordPress correctly detects HTTPS | Themes or plugins that depend on .htaccess need their rules rewritten |
| Proxy | Caddy → Apache / Nginx → PHP | You keep the existing server. One entry point for multiple sites | HTTPS detection, real IP, redirect loops |
For a new WordPress install, the direct setup is simpler. Caddy's official Common Caddyfile Patterns include a WordPress example that shows how to block xmlrpc.php and PHP files inside wp-content/uploads.
example.com {
	root * /var/www/wordpress
	encode
	php_fastcgi unix//run/php/php8.3-fpm.sock
	file_server

	@blocked path /xmlrpc.php *.sql /wp-content/uploads/*.php
	rewrite @blocked /index.php
}
The rest of this article covers the proxy setup, where you keep your existing Apache or Nginx.
Step 1: Check the Caddy configuration
A minimal Caddyfile is enough. When proxying, Caddy appends the client IP to X-Forwarded-For and sets X-Forwarded-Proto (https) and X-Forwarded-Host (official reverse_proxy documentation). The Host header is passed through unchanged, so the virtual host on the backend web server still matches.
example.com {
	reverse_proxy 127.0.0.1:8080
}
This assumes the backend web server listens for HTTP on port 8080 on the same host. If a CDN (such as Cloudflare) sits in front of Caddy, you must declare servers { trusted_proxies static <CDN IP ranges> } in the global options; otherwise the IP that ends up in X-Forwarded-For is the CDN's.
Step 2: Tell WordPress it is on HTTPS
WordPress looks at $_SERVER['HTTPS'] to decide whether it is on HTTPS. In a proxy setup the backend server receives HTTP, so this value is empty, and redirects loop forever between it and FORCE_SSL_ADMIN or an https:// site URL. The fix shown in WordPress's official Administration Over SSL is to read X-Forwarded-Proto and fill in HTTPS.
Add this to wp-config.php before /* That's all, stop editing! */.
if ( isset( $_SERVER['HTTP_X_FORWARDED_PROTO'] ) && strpos( $_SERVER['HTTP_X_FORWARDED_PROTO'], 'https' ) !== false ) {
	$_SERVER['HTTPS'] = 'on';
}
define( 'FORCE_SSL_ADMIN', true );
Some environments put several comma-separated values in X-Forwarded-Proto, so, like the official example, this uses strpos to check whether it contains https.
This setting means "trust the forwarded headers". If the backend web server can also be reached directly by anything other than Caddy, an outside request with X-Forwarded-Proto: https can spoof it. Make the backend listen only on 127.0.0.1, or allow only connections from Caddy in the firewall.
Step 3: Fix the site URL to https
Under Settings > General, set the WordPress Address and Site Address to https://example.com. If you cannot get into the admin screen, fix them in wp-config.php.
define( 'WP_HOME', 'https://example.com' );
define( 'WP_SITEURL', 'https://example.com' );
If existing post content or image URLs still use http://, you get mixed content. Use WP-CLI's wp search-replace 'http://example.com' 'https://example.com' --dry-run to check the count before replacing (back up the database first; see "How to back up the WordPress database manually").
Step 4: Restore the real IP
In a proxy setup, every request looks to the backend as if it came from Caddy's IP. Left as is, the commenter IP, login attempt limits and the IP checks of security plugins such as Wordfence do not work. The standard approach is to restore it on the web server side.
Apache (mod_remoteip):
RemoteIPHeader X-Forwarded-For
RemoteIPTrustedProxy 127.0.0.1
Nginx (ngx_http_realip_module):
set_real_ip_from 127.0.0.1;
real_ip_header X-Forwarded-For;
real_ip_recursive on;
Put only Caddy's IP in set_real_ip_from and RemoteIPTrustedProxy. REMOTE_ADDR then becomes the real IP, and nothing needs to change in WordPress. Only if you cannot change the web server configuration, you can instead copy the first entry of X-Forwarded-For into REMOTE_ADDR in wp-config.php, but do not do this where the header can be spoofed.
Step 5: Verify
# Does the redirect stop after one hop (no repeated 301/302)?
curl -sIL https://example.com/wp-login.php | grep -i -E "^HTTP|^location"
# Are URLs returned as https?
curl -s https://example.com/wp-json/ | head -c 300
# Check for mixed content (http:// references)
curl -s https://example.com/ | grep -o 'http://example.com[^"]*' | head
Also check the browser's developer tools for Mixed Content warnings in the console. For the real IP, post a test comment; if the IP shown in the admin comment list is your own, it has been restored.
The WordPress angle
A common question we receive is "after moving servers or switching to HTTPS, the login screen will not open (it keeps redirecting)". Most of the time the cause is what Steps 2 and 3 cover, and a few lines in wp-config.php fix it. Because you are working without access to the admin screen, first make sure you can edit wp-config.php over FTP or SSH. For deciding whether to fix it yourself or hire someone, see "Fixing WordPress problems yourself vs hiring help".
FAQ
WordPress behind Caddy keeps looping on login
The backend server receives HTTP, but the site URL is https:// or FORCE_SSL_ADMIN is enabled. Add code to wp-config.php that checks HTTP_X_FORWARDED_PROTO and sets $_SERVER['HTTPS'] = 'on'. Caddy adds this header by default, so nothing needs to change on the Caddy side.
Do I need to add headers in Caddy?
X-Forwarded-For, X-Forwarded-Proto and X-Forwarded-Host are added by default. Add header_up X-Real-IP {remote_host} only when the backend configuration expects X-Real-IP.
Should I use the proxy setup or the direct setup?
If everything runs on one server and you have no plugins that depend on .htaccess, the direct php_fastcgi setup is simpler and avoids the problems in this article. Choose the proxy setup when you have a reason to keep your existing Apache or Nginx (other sites share the server, or you have a lot of .htaccess configuration).
What happens to the IP if traffic goes through both Cloudflare and Caddy?
Requests pass Cloudflare → Caddy → web server, so unless Caddy trusts Cloudflare's IP ranges via trusted_proxies, the IP in X-Forwarded-For is Cloudflare's. For the Cloudflare side, see "How to set up Cloudflare for WordPress".
Summary
- When WordPress sits behind a Caddy reverse proxy, check
HTTP_X_FORWARDED_PROTOinwp-config.phpto setHTTPStoon, and fixWP_HOME/WP_SITEURLtohttps://. - Restore the real IP with Apache's
mod_remoteipor Nginx'sreal_ip_header, trusting only Caddy's IP as a proxy. - If one server is enough, the direct
php_fastcgisetup avoids these problems.
Related articles
- How to set up a reverse proxy with Caddy: reverse_proxy in the Caddyfile, automatic HTTPS, headers and verification
- How to set up Cloudflare for WordPress
- How to back up the WordPress database manually
- Fixing WordPress problems yourself vs hiring help
References: WordPress Developer Resources – Administration Over SSL (Using a Reverse Proxy), Caddy – reverse_proxy, Caddy – Common Caddyfile Patterns
Update history: 2026-11-09 full revision (replaced boilerplate with how to handle HTTPS detection, real IP and redirect loops when running WordPress behind Caddy, and added when to use the direct php_fastcgi setup instead). This article is published by WordPress Hakase (Lightscend Inc.).
Questions about WordPress? The publisher of this site is based in Japan and replies in Japanese. Contact (Japanese)