

This article is a localized edition of the Japanese original. Read the Japanese original
Port forwarding on FortiGate takes two separate settings: (1) a "Virtual IP (VIP)" that maps "WAN-side IP address:port → internal server IP address:port", and (2) a firewall policy from the WAN to the inside that names that VIP as the destination and allows the traffic. What a home router does on a single "port forwarding" screen is split in FortiOS into "defining the address translation" and "deciding whether to let it through".
Here is the summary up front.
- Create the VIP under "Policy & Objects → Virtual IPs". Set the external IP (WAN side) and the internal IP (mapped to), enable port forwarding, and specify the protocol, external port and internal port.
- Create the policy under "Policy & Objects → Firewall Policy" with incoming interface = WAN, outgoing interface = the LAN where the server is, destination = the VIP you created, service = the ports to open, and action = ACCEPT.
- If you cannot pick the VIP as a destination, either the VIP's "Interface" does not match the policy's incoming interface, or Central NAT is enabled.
- When traffic does not get through, use
diagnose sniffer packetto check stage by stage whether packets reach the WAN and whether they leave toward the inside. - Keep the published ports to the minimum. For WordPress, pass only 80 / 443 and reach management ports (SSH, RDP, databases) through a VPN.
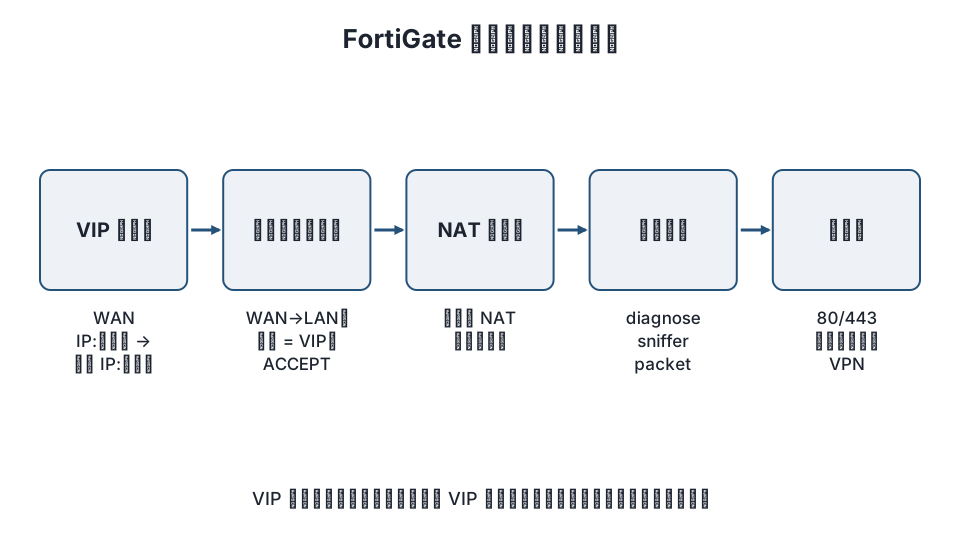
How port forwarding works on FortiGate
In FortiOS, the feature that rewrites the destination of incoming traffic to an internal server is called a Virtual IP (VIP, destination NAT). A VIP comes in two forms.
| Type | What it does | Use case |
|---|---|---|
| Static VIP (one-to-one) | Maps one WAN-side IP address to one internal IP address. Ports are not changed | You have several public IPs and assign one to each server |
| Port forwarding VIP | Maps a WAN-side IP:port to an internal IP:port | You have one public IP and send each port to a different server or port |
This article covers the latter. The official guide's example also shows external ports 8080 / 8081 / 8082 forwarded to port 80 on three web servers. You cannot send the same port of one public IP to two servers (change the external port in that case).
Creating a VIP alone does not let traffic through. FortiGate judges all traffic by policy, so you also need an allow policy whose destination is the VIP.
Step 1: Create the Virtual IP
In the GUI, create it from "Policy & Objects → Virtual IPs". Enter the following fields.
| Field | Value |
|---|---|
| Name | A recognizable name (e.g. vip-web-443) |
| Interface | The interface where outside traffic comes in (e.g. wan1). any is also allowed |
| External IP address/range | The WAN-side IP address (the WAN interface's IP, or an additional IP assigned by the ISP) |
| Map to IPv4 address/range | The internal server's IP address |
| Port Forwarding | Enabled |
| Protocol | TCP (or UDP) |
| External service port | The port to accept from outside (e.g. 443) |
| Map to IPv4 port | The port on the server (e.g. 443, or something like 8443 to change it) |
The same settings in the CLI look like this (field names differ slightly between versions; check the CLI reference for your version).
config firewall vip
    edit "vip-web-443"
        set extip 203.0.113.10
        set extintf "wan1"
        set portforward enable
        set mappedip "192.168.1.20"
        set protocol tcp
        set extport 443
        set mappedport 443
    next
end
To open 80 as well, create another VIP (vip-web-80) the same way. When you use several VIPs in a policy, bundling them in a VIP Group under "Policy & Objects → Virtual IPs" lets one policy cover them all.
Step 2: Allow it with a firewall policy
Create a new policy under "Policy & Objects → Firewall Policy".
| Field | Value |
|---|---|
| Incoming Interface | wan1 (the same as the VIP's Interface) |
| Outgoing Interface | The internal interface where the server is (e.g. lan or dmz) |
| Source | all (for a public server). If only specific sites should connect, their address object |
| Destination | The VIP you created (or a VIP Group) |
| Service | The services matching the ports to open, such as HTTPS (443) and HTTP (80) |
| Action | ACCEPT |
| NAT | Disabled as a rule (see below) |
| Log Allowed Traffic | Enable it to make later checks easier |
Here is a CLI example.
config firewall policy
    edit 0
        set name "wan-to-web"
        set srcintf "wan1"
        set dstintf "lan"
        set srcaddr "all"
        set dstaddr "vip-web-443" "vip-web-80"
        set action accept
        set schedule "always"
        set service "HTTPS" "HTTP"
        set nat disable
        set logtraffic all
    next
end
About the NAT setting
The NAT (source NAT) on this policy is normally disabled. If you enable it, every connection appears to the server to come from FortiGate's internal IP, and the web server's access log and WordPress login limits can no longer tell visitors' IPs apart. Enable NAT only when the server's default gateway is not the FortiGate and return traffic would leave by a different path.
When the VIP does not appear as a destination option
It is one of these two.
- Interface mismatch: If the VIP's Interface is
wan1, it appears as an option only when the policy's Incoming Interface is alsowan1. Set the VIP toanyor match the policy to it. - Central NAT is enabled: On a FortiGate with Central NAT enabled (using "Policy & Objects → Central SNAT" and "Central DNAT"), VIPs are handled in the "Central DNAT" list rather than as policy destinations, and the policy's destination is the internal server's real address. Only the place you configure it changes; the work is the same.
Step 3: Check that traffic gets through
Connect from outside (a line outside your organization, such as smartphone tethering) with a browser or curl.
curl -vk https://203.0.113.10/ --max-time 10If it does not connect, use a packet capture in the FortiGate CLI to see how far the traffic gets.
diagnose sniffer packet any 'host 203.0.113.10 and tcp port 443' 4 20 lThe format is diagnose sniffer packet <interface> '<filter>' <verbosity> <count> <timestamp format>. At verbosity 4, each line shows the interface name and direction plus the source and destination. Read it like this.
| What you see | What it means |
|---|---|
| Nothing | Traffic is not reaching the WAN. Possible causes include ISP restrictions, an upstream router, or DNS pointing to a different IP |
Only wan1 in, no lan out |
FortiGate is dropping it. Review the policy conditions (interfaces, service, schedule) or the VIP settings. Also check for deny logs under "Log & Report → Forward Traffic" |
lan out appears but no reply |
The server is not responding. Check the server-side firewall (ufw / Windows Defender), the listening address and the default gateway |
| Replies appear but the site is not reachable from outside | The return path is different (asymmetric). Make FortiGate the server's default gateway, or enable NAT on the policy |
diagnose debug flow lets you trace which policy matched (or that none did).
Precautions when publishing a server
- Open only the ports you need: Even if you change the external port (e.g. 2222 → 22), scans will find it. Do not expose SSH, RDP or database ports; use them through FortiGate's SSL-VPN or IPsec VPN.
- Limit the source: For a service used only from a partner's site, set Source to that IP address.
- Keep logs: Enable logging on the policy and regularly check "Log & Report → Forward Traffic" for connections from unexpected sources.
- Security profiles: If you have the licenses, you can attach IPS and Web Application Firewall profiles to the policy for a public web server. Brute-force logins against WordPress and similar activity also show up there.
Publishing a WordPress server behind FortiGate
When you publish an in-house or company data center WordPress through FortiGate, check the following.
- Pass only 80 and 443 through the VIP. The admin area (
/wp-admin/) arrives over the same 443, so add login limits and two-factor authentication on the WordPress side. - Whether visitor IPs reach WordPress: With NAT disabled on the policy, the server sees visitors' IPs as they are. If you enable it, login-limiting plugins treat every visitor as the same IP, so be careful.
- Where HTTPS terminates: Handling certificates on the web server (Nginx / Apache) is the common setup. Terminating on FortiGate (Virtual Server) is also possible, but it is configured separately.
- Hairpinning (opening the public URL from inside): When you open
https://www.example.comfrom inside the office, DNS returns the public IP and the traffic heads to FortiGate's WAN. To make that work, you need an internal-facing policy and NAT, or internal DNS that returns the internal IP (split DNS).
To check the server's listening ports and what is visible from outside, see How to use nmap.
FAQ
I created a VIP but traffic does not get through
A VIP only creates the mapping; the policy decides whether traffic passes. Check that there is a WAN → LAN ACCEPT policy with the VIP as destination, that the policy's service matches the port you want to open, and that nothing earlier in the policy order denies it first.
Can the external and internal ports differ?
Yes. Set different values for the VIP's External service port and Map to IPv4 port, for example external 8443 to internal 443. Match the policy's service to the external port (8443 in this example).
Can I send the same port to two servers?
The same port on the same public IP can map to only one server. Change the external port (8080 and 8081, for example), add a public IP, or use FortiGate's Virtual Server (load balancing). For web servers, routing by host name with a reverse proxy is also common.
Should I enable NAT on the policy?
For public servers, disabled is the rule. Enabling it makes connections appear to come from FortiGate's IP, and access logs and login limits stop working. If the server's default gateway is FortiGate and the return path is the same, traffic gets through with NAT disabled.
Everything looks right, but I cannot open the public URL from inside the office
This is a hairpin NAT issue. The simplest fix is to have internal DNS return the internal IP for office users (split DNS). To handle it on FortiGate, add a LAN → LAN policy (both incoming and outgoing are internal interfaces) with the VIP as destination and NAT enabled.
Summary
- FortiGate port forwarding is two steps: create the "WAN IP:port → internal IP:port" mapping with a VIP, then ACCEPT it with a WAN → inside policy whose destination is the VIP.
- Normally disable NAT on the policy; if the VIP does not appear as an option, check that the interfaces match and whether Central NAT is on.
- When traffic does not get through, use
diagnose sniffer packetto check three points (reaches WAN → leaves toward the inside → reply) and isolate where the problem is. Publish only 80 / 443 and reach management ports through a VPN.
Related articles
- How to use nmap and port scanning basics: checking your server's open ports
- How Azure NSG priorities work and how to configure them
- How to detect unauthorized access to a server
- The complete guide to setting up Cloudflare for WordPress
References: FortiOS Administration Guide – Virtual IPs with port forwarding, CLI Reference – config firewall vip, Fortinet Community – Technical Tip: Virtual IP (VIP) port forwarding configuration, Fortinet Community – Using the FortiOS built-in packet sniffer
Revision history: 2026-11-09 full revision (replaced the boilerplate body with the two-step VIP and policy setup, CLI examples, troubleshooting with sniffer, and notes on publishing WordPress). This article is run by WordPress Hakase (Lightscend Inc.).
Questions about WordPress? The publisher of this site is based in Japan and replies in Japanese. Contact (Japanese)